Step-by-Step Guide to Building an Nginx-RTMP Streaming Media Server (Ubuntu/Windows)
Author Introduction
👋 Hi, I'm the webmaster of EZ Media Tools, focused on multimedia online video technology and browser-based tool development.
EZ Media Tools is a tool platform centered on online video processing, providing features including M3U8 online playback, M3U8 to MP4, RTMP/HLS stream testing, FFmpeg online transcoding, and more—all usable directly in the browser without installing a client.
Introduction
With the explosion of the live streaming industry, Bilibili, Douyin, and WeChat Video have become part of our lives. But have you ever wondered about the technical principles behind these glamorous live streams? If we want to build our own private server, or set up a monitoring streaming server within an intranet, how should we do it? This article will teach you, starting from scratch with super detailed instructions, how to compile, configure, and run an Nginx-RTMP streaming media server on Ubuntu and Windows, the two mainstream platforms. You'll not only "know what it is," but also "know why it is."
Why Choose Nginx-RTMP?
In the streaming media field, there are many protocols, such as RTMP, HLS, FLV, WebRTC, etc., and servers like SRS, ZLMediaKit, Nginx-RTMP, etc. Why specifically choose Nginx-RTMP? I've summarized the following advantages:
- High Performance: As is well known, Nginx's high concurrency capability is world-renowned.
- Extremely Lightweight: Very low resource usage; a 1-core 1GB cloud server can handle hundreds of streams.
- Simple Configuration: One nginx.conf rules them all.
- Powerful Features: Supports RTMP streaming, while also supporting HTTP-FLV and HLS playback, perfectly compatible with PC and mobile.
Article Goal: Build a server that achieves the complete loop: OBS push -> Server -> VLC/Browser playback.
Prerequisites
To do good work, one must first sharpen one's tools. Please prepare the following environment:
- A server/computer: Cloud server (recommended Ubuntu 20.04/22.04) or local Windows computer.
- Streaming tool: OBS Studio (open source and free, the Swiss army knife of streaming).
- Playback tool: VLC Media Player (universal player).
- Code editor: VS Code, Notepad++, or Vim.
Ubuntu Platform Setup
For demonstration purposes, I'm using Ubuntu here. We won't use apt install here because the Nginx in the official repositories doesn't come with the RTMP module, so we need to compile from source. Sound scary? It's actually just a matter of copying and pasting a few commands. 😎
Install Compilation Dependencies
Open a terminal and execute the following commands in order:
# Update software sources
sudo apt-get update

# Install compilation tools and dependency libraries
sudo apt-get install build-essential libpcre3 libpcre3-dev libssl-dev zlib1g-dev unzip wget
Download Nginx and RTMP Module
We need two compressed packages: Nginx source package, Nginx-RTMP-Module module package.
# Create a working directory
mkdir ~/nginx-build && cd ~/nginx-build

# Download Nginx (recommend 1.20.x version, stable)
wget http://nginx.org/download/nginx-1.20.2.tar.gz

# Download RTMP module (original by arut)
wget https://github.com/arut/nginx-rtmp-module/archive/master.zip
Extract and Configure
# Extract
tar -zxvf nginx-1.20.2.tar.gz
unzip master.zip

# Enter Nginx directory
cd nginx-1.20.2
The most critical step comes: configure compilation parameters. We need to tell Nginx: in addition to its built-in functionality, also package the nginx-rtmp-module next door.
./configure \
--prefix=/usr/local/nginx \
--add-module=../nginx-rtmp-module-master \
--with-http_ssl_module \
--with-http_v2_module
Parameter Explanation:
--prefix: Specify installation directory for easier management.--add-module: Specify RTMP module source path—note it's the master folder in the parent directory.--with-http_ssl_module: Enable SSL support—note: HLS must use HTTPS.
If there's no error, "configured successfully" will be displayed at the end.
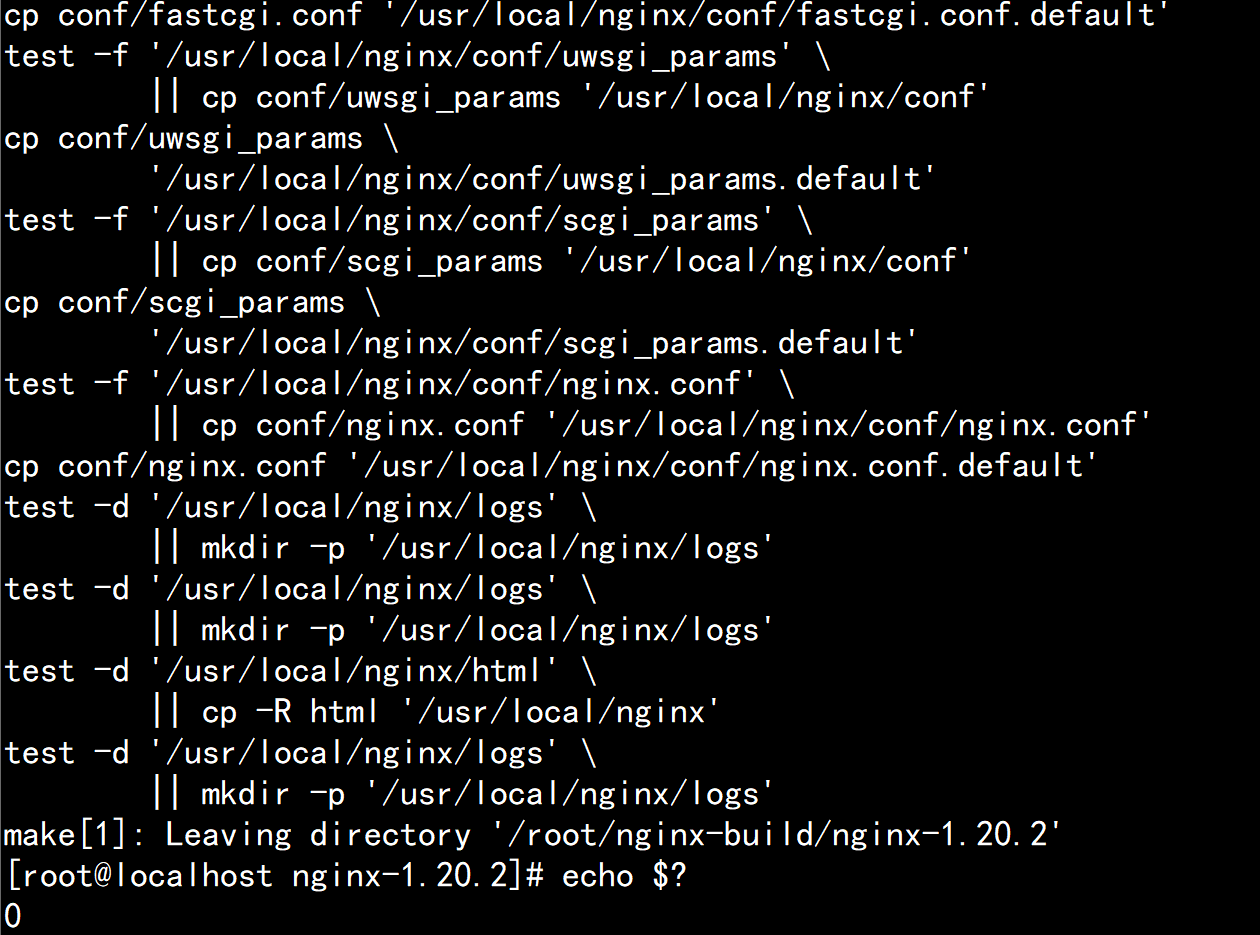
Compile and Install
# Compile (make), -j4 means using 4 cores to compile, fast. Adjust core count based on machine configuration
make -j4

sudo make install
After installation is complete, your Nginx will be in the /usr/local/nginx directory.
Ubuntu System Service Configuration
Create a systemd service file:
sudo vim /etc/systemd/system/nginx-rtmp.serviceAdd the following content:
[Unit]
Description=nginx-rtmp server
After=network.target

[Service]
Type=forking
PIDFile=/usr/local/nginx/logs/nginx.pid
ExecStart=/usr/local/nginx/sbin/nginx
ExecReload=/usr/local/nginx/sbin/nginx -s reload
ExecStop=/usr/local/nginx/sbin/nginx -s quit
PrivateTmp=true

[Install]
WantedBy=multi-user.target
Enable the service:
sudo systemctl enable nginx-rtmp
sudo systemctl start nginx-rtmp
Windows Platform Setup
The Windows compilation environment is too troublesome, but fortunately there are precompiled binary packages made by experts.
Download and Extract
- Visit the GitHub repository: illuspas/nginx-rtmp-win32.
- Download the latest
nginx-rtmp-win32-1.2.1.zip. - Extract to a non-Chinese path, for example
D:\nginx-rtmp.
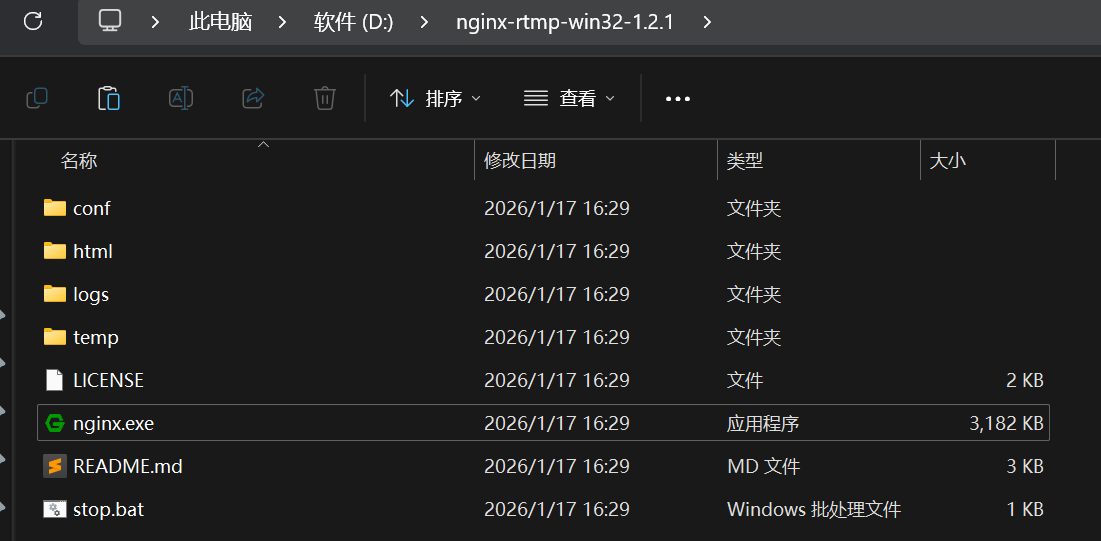
See nginx.exe? That's our protagonist.
Core Configuration: nginx.conf Explained
Whether Ubuntu or Windows, the soul is in the conf/nginx.conf file. Open it with an editor, find the http { ... } section, and at the same level outside it, add the following rtmp configuration:
rtmp {
    server {
        listen 1935; # RTMP default port
        chunk_size 4096;

        application live {
            live on;             # Enable live mode
            record off;          # Disable recording (save disk space)
            allow publish 127.0.0.1; # Allow streaming client IP—for production, recommend changing to intranet IP or password verification

            # Enable HLS slicing
            hls on;
            hls_path /tmp/hls;   # Ubuntu path
            # hls_path D:/nginx-rtmp/temp/hls; # Windows path—note forward slashes
            hls_fragment 3s;     # Each slice is 3 seconds
            hls_playlist_length 10s; # Playlist length is 10 seconds
        }
    }
}

http {
    include       mime.types;
    default_type  application/octet-stream;
    sendfile        on;
    keepalive_timeout  65;

    server {
        listen       80; # HTTP default port, for HLS playback
        server_name  localhost;

        # HLS playback configuration
        location /hls {
            types {
                application/vnd.apple.mpegurl m3u8;
                video/mp2t ts;
            }
            root /tmp; # Ubuntu
            # root D:/nginx-rtmp/temp; # Windows
            add_header Cache-Control no-cache;
        }
    }
}
After saving configuration:
- Ubuntu:
sudo /usr/local/nginx/sbin/nginxto start. - Windows: Double-click
nginx.exeto start (a black window will flash).
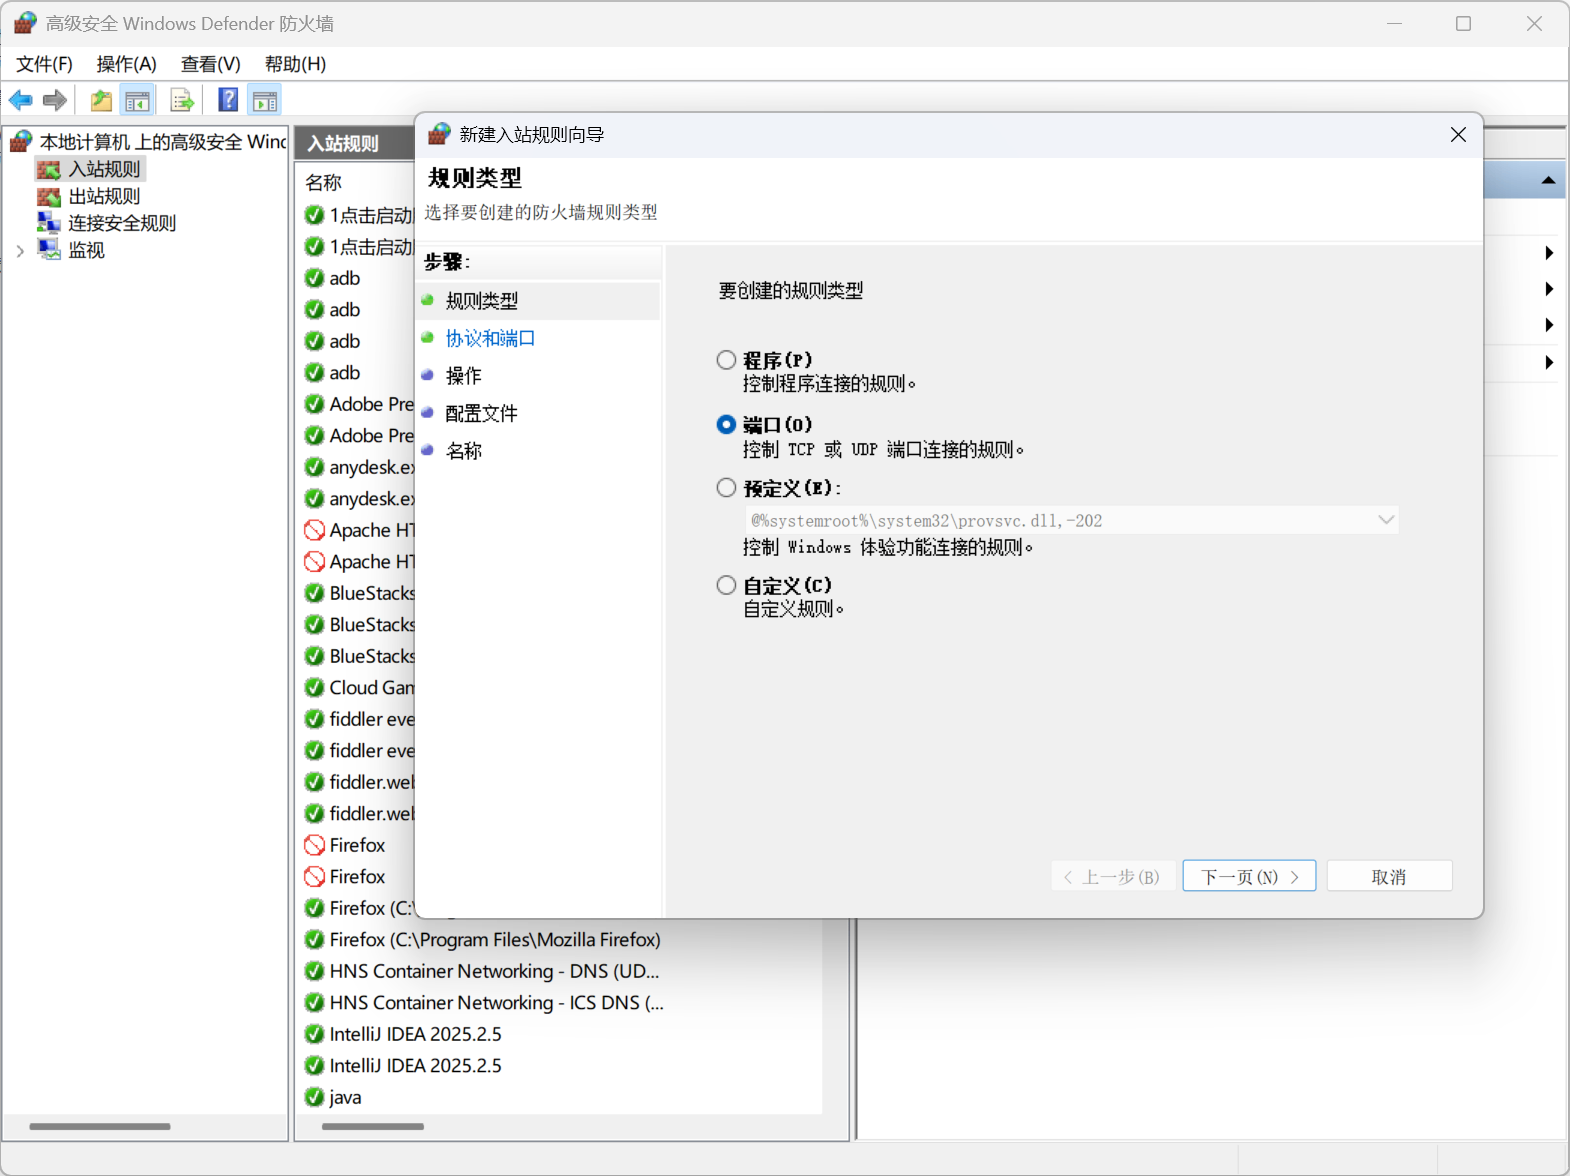
Firewall Note: Must open 1935 (streaming) and 80 (playback) ports!
- Ubuntu:
sudo ufw allow 1935 && sudo ufw allow 80- Windows: Firewall Advanced Settings -> Inbound Rules -> New Rule -> Port -> TCP 1935, 80.
Practical Streaming: OBS Connects to Server
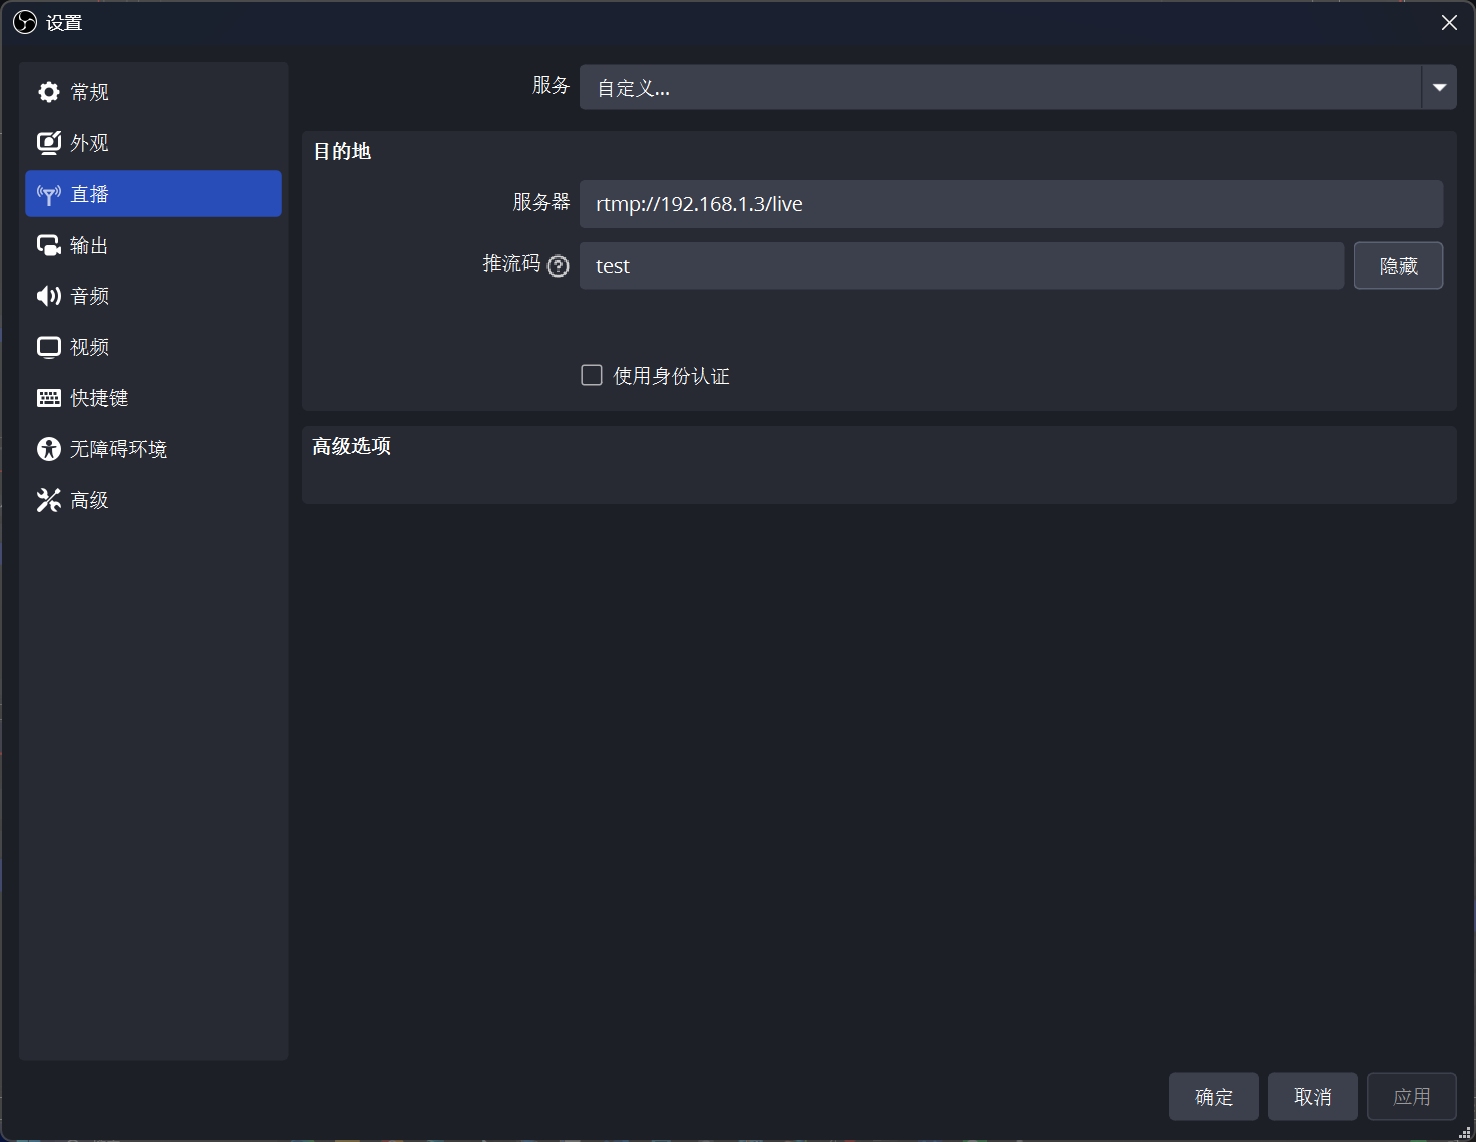
Replace the server below with your actual situation. My IP here is 192.168.1.3.
OBS Settings
Sources: Add "Display Capture" or "Video Capture Device".
Settings -> Stream:
- Service: Custom
- Server:
rtmp://192.168.1.3/live - Stream Key:
test—this can be customized, equivalent to a room number
Settings -> Output:
- Bitrate: 2000 Kbps (2Mbps) is sufficiently clear.
- Output Mode -> Keyframe Interval: 2 seconds.
Click "Start Streaming"
If OBS shows "Streaming" in the bottom right corner and the bitrate isn't 0, congratulations! Data has been sent!
Practical Pull Streaming: Three Ways to Watch Live Stream
You've pushed it, how to watch? There are three mainstream protocols.
| Protocol | URL Format | Latency | Pros | Cons |
|---|---|---|---|---|
| RTMP | rtmp://ip/live/test | 1-3 seconds | Extremely low latency | Browsers don't support, need player |
| HTTP-FLV | http://ip/live/test.flv | 2-5 seconds | Low latency, web-playable | Requires flv.js support |
| HLS | http://ip/hls/test.m3u8 | 10-30 seconds | Best compatibility | High latency |
Method 1: VLC Playback
- Open VLC -> Media -> Open Network Stream.
- Enter:
rtmp://yourIP/live/test - Press Enter, the picture appears!

Method 2: Browser Playback HLS (Safari/Edge)
Enter directly in the address bar: http://yourIP/hls/test.m3u8 Safari and Edge natively support HLS, so you can watch directly. Chrome needs a plugin.
Method 3: Web Playback HTTP-FLV
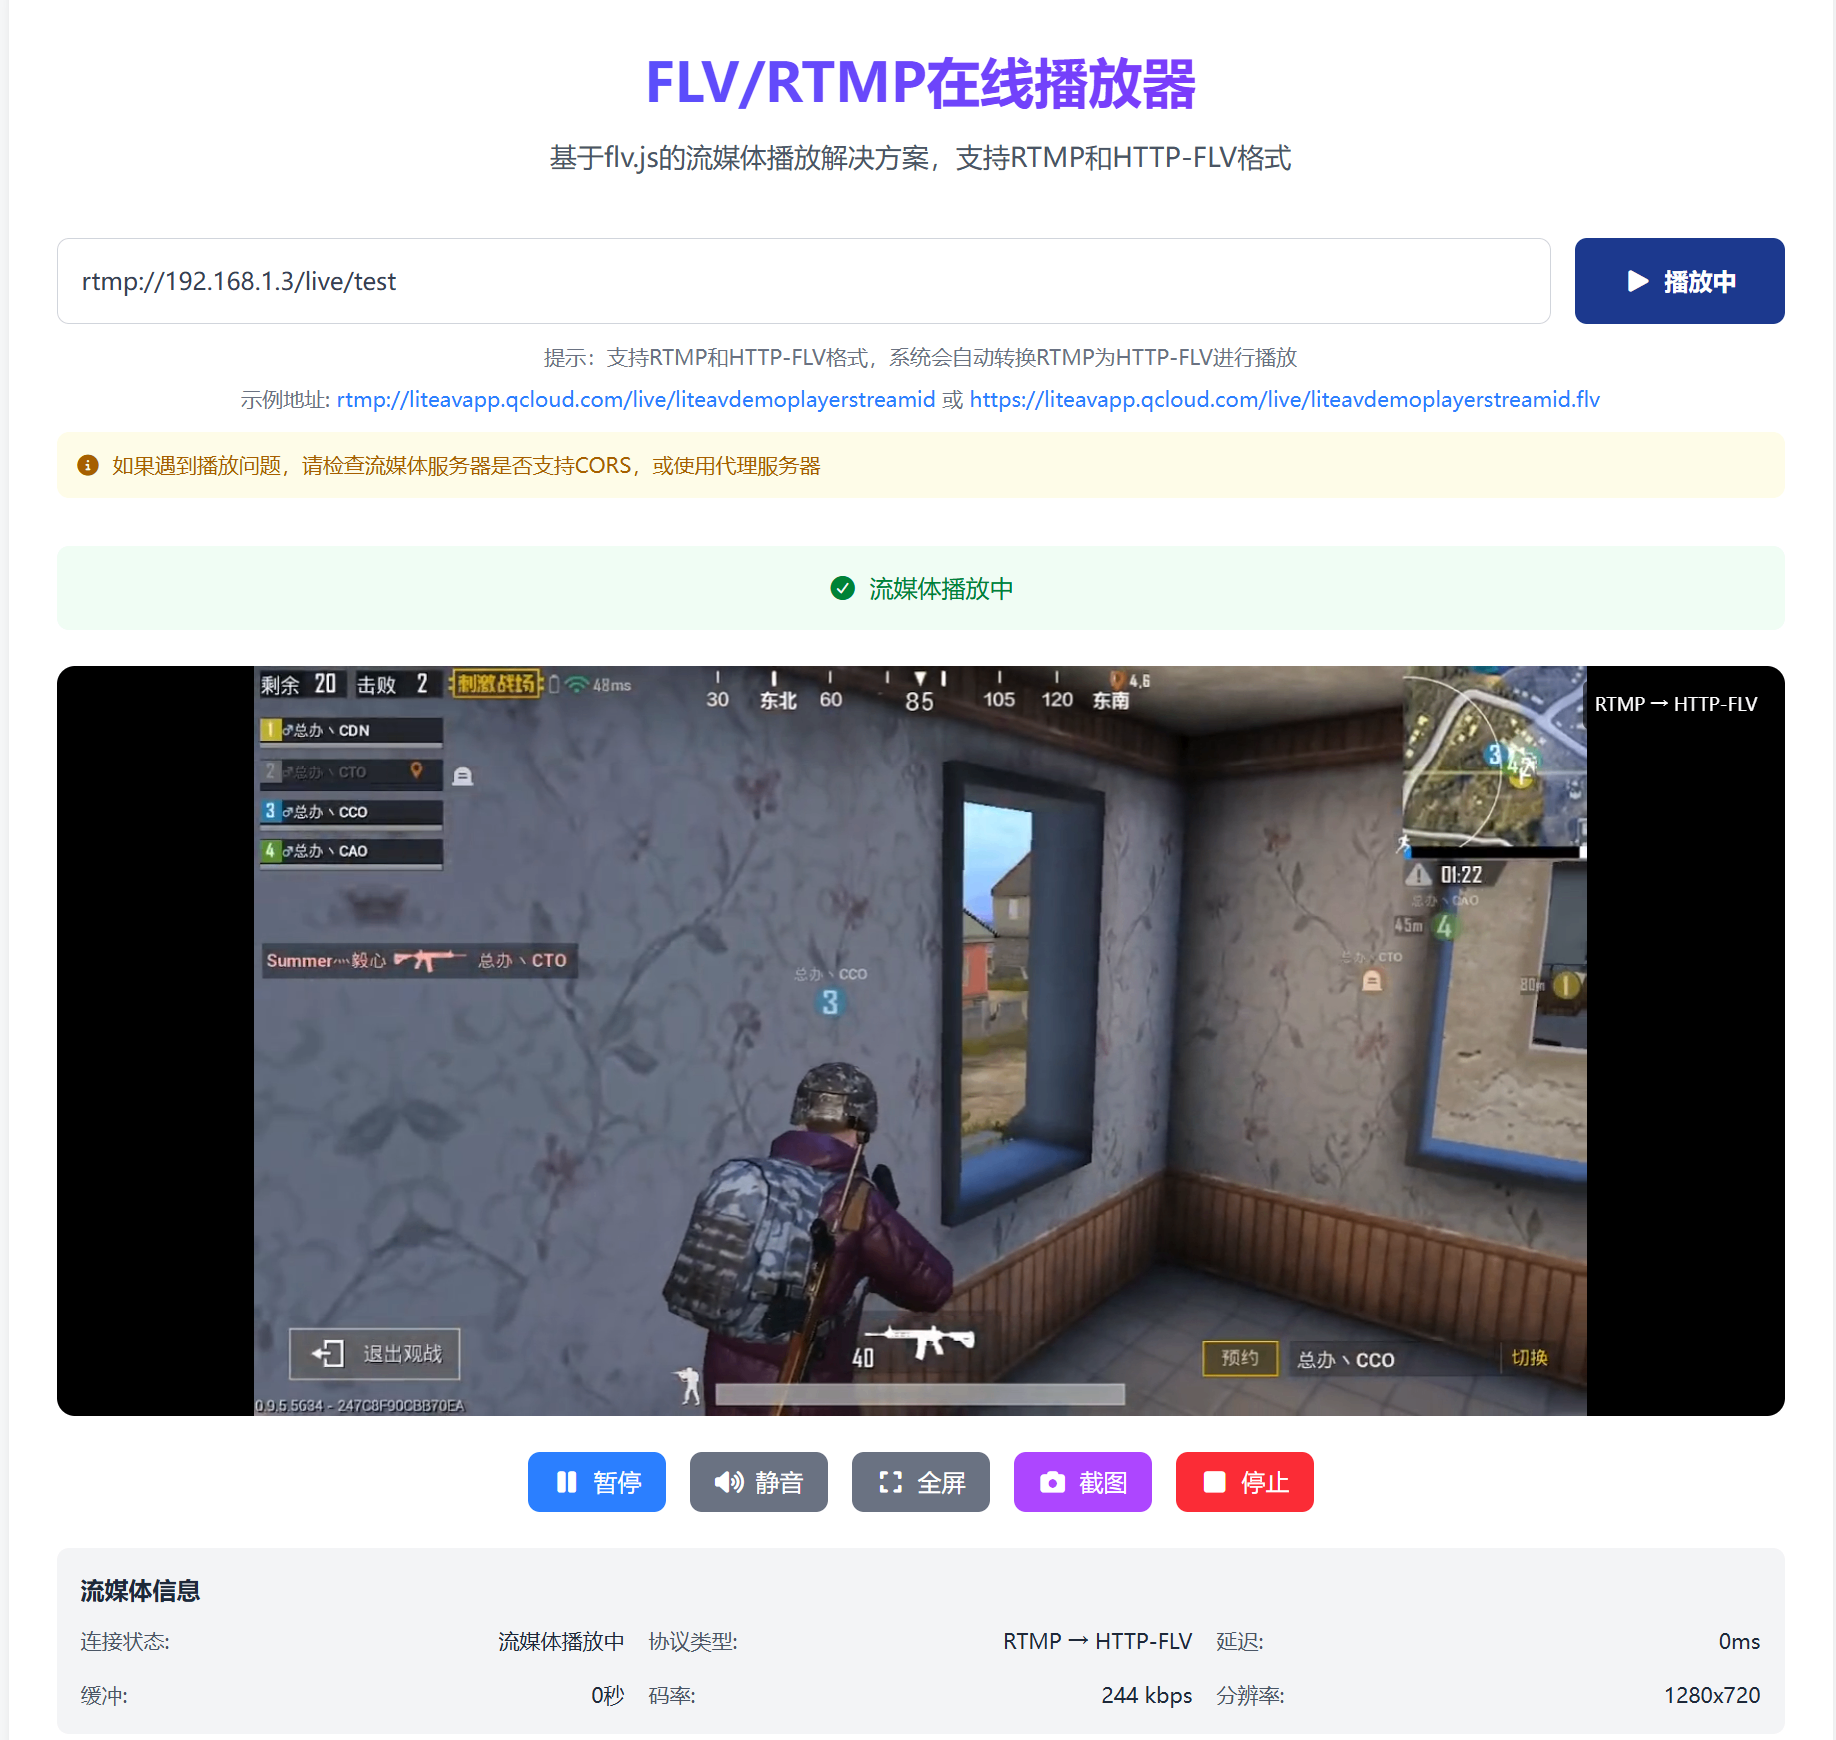
Here I recommend EZ Media Tools' FLV & RTMP Player Online, saving you development trouble. Very suitable for RTMP live stream testing, supporting RTMP and FLV formats, real-time live stream information, screenshots, and more.
If you want to write it yourself, you can refer to Bilibili's open source flv.js. Create an index.html file and paste the following code:
<!DOCTYPE html>
<html>
<head>
    <meta charset="UTF-8">
    <title>Nginx-RTMP Live Stream</title>
    <script src="https://cdn.bootcss.com/flv.js/1.5.0/flv.min.js"></script>
</head>
<body>
    <h1>My Live Room</h1>
    <video id="videoElement" controls width="800" height="450"></video>
    <script>
        if (flvjs.isSupported()) {
            var videoElement = document.getElementById('videoElement');
            var flvPlayer = flvjs.createPlayer({
                type: 'flv',
                url: 'http://yourIP/live/test.flv' // Note: this is flv
            });
            flvPlayer.attachMediaElement(videoElement);
            flvPlayer.load();
            flvPlayer.play();
        }
    </script>
</body>
</html>Note: The
nginx.confabove doesn't enable flv by default. To enable it, addallow publish 127.0.0.1;inrtmp -> application live, then add inhttp server:nginxlocation /live { flv_live on; chunked_transfer_encoding on; add_header 'Access-Control-Allow-Origin' '*'; }
Advanced: Intranet Penetration for External Access
If you built it on your own computer (Windows) and your friend wants to watch, what do you do? You don't have a public IP.
There are three solutions:
- Oray/Frp: Simple, but free version has speed limits.
- Zerotier/Hamachi: Build a virtual LAN, friend installs a client, accesses with intranet IP.
- Ngrok: Foreign tool, stable but costs money.
The simplest method (router port forwarding): If you have a public IP with optical modem dial-up:
- Login to router (192.168.1.1).
- Find "Virtual Server" or "Port Forwarding".
- Add two rules:
- External port 1935 -> Internal IP (your computer's IP) -> Internal port 1935
- External port 80 -> Internal IP (your computer's IP) -> Internal port 80
- Fill in your public IP for the streaming address.
Common Troubleshooting
| Phenomenon | Cause | Solution |
|---|---|---|
OBS streaming error connection refused | Firewall blocking / Nginx not started | Check firewall, `ps -ef |
| OBS streaming successful, VLC black screen | Incorrect encoding format | Change OBS video encoding to H.264, audio to AAC |
| Public network inaccessible, intranet works | No port forwarding / No public IP | Do forwarding on router, or use Frp |
| HLS playback 404 | Incorrect Nginx configuration path | Check if hls_path and location /hls's root correspond |
Checking logs is a good habit!
- Ubuntu:
tail -f /usr/local/nginx/logs/error.log - Windows:
logs/error.log
Summary and Outlook
Congratulations! You've mastered the most core streaming media server building technology.
Let's review what we did:
- Completed Ubuntu / Windows Nginx-RTMP module environment setup.
- Configured
nginx.conffor RTMP streaming. - Established the OBS -> Nginx -> VLC link.
What can you play with next?
- Recording and Playback: Configure
record all;andexec_record_donescripts to implement automatic live recording and upload to VOD system. - Multi-bitrate: Configure
ffmpegtranscoding to let users choose 720P/1080P based on network speed. - Authentication: Prevent others from streaming randomly, configure
on_publishinterface callback to verify keys. - WebRTC: Nginx-RTMP latency is still a bit high. Want interactive video chat? Go study ZLMediaKit or SRS—they natively support WebRTC with latency under 500ms.